
13 Days to Escape Stealth Guide: Avoid Suspicion During Jobs and Escape Prep
Keep suspicion low while working prison jobs and preparing your escape in 13 Days to Escape: hold your assigned area, answer the RETURN TO CELLS countdown, choose jobs carefully, and save the risky steps for night.
Staying unnoticed in 13 Days to Escape comes down to one habit: stay in the area the current phase assigns you, keep an eye on the suspicion meter at the bottom centre of the HUD, and be back in your cell before the RETURN TO CELLS countdown ends. The prison routine is your cover; the escape work that could expose you belongs in the night window.
- Area first. The top-centre display names the day, room and clock — for example,
DAY 01 LIBRARY 01:42. Treat the room it names as where the routine expects you to be. - Suspicion is a total, not a breakdown. The bottom-centre meter shows a running percentage. Being out of area is the clearest reason the game shows for it climbing.
- The countdown is a deadline. RETURN TO CELLS runs before LOCKDOWN; making it back in time lets you keep working on escape prep.
- Day for normal, night for risky. The official description's own summary is "Act normal by day. Plan your escape by night."
What raises suspicion in 13 Days to Escape
The clearest cause the game shows is being outside the area the routine expects. In one co-op session, a player out of position said, "I'm out of area, so my suspicion's rising." That fits the way prison life is scheduled: the room label and clock move with the day, and wandering somewhere else is what draws attention.
A second moment shows how hard the meter is to read. A player died with high suspicion and offered two explanations — they had climbed to the top bunk, and they were out of area. Their teammate rejected the bunk: "Yeah, you're wrong with the top. You were out of area." The exchange does not settle whether the bunk had anything to do with it, and the HUD does not itemise which action added suspicion. The practical lesson is to treat the meter as a total rather than a receipt: when it starts climbing, check the obvious thing first — are you where the routine says you should be?
The meter reads as a percentage. A full playthrough showed values such as 15%, 23% and 31% at different points. Read it as a trend rather than a target; the direction it is moving is more useful than any single figure.
The objective panel reinforces the same priority. It sits in the top right and always opens with "Don't get suspicious" before listing the current task — buying a screwdriver from OJ, unscrewing the toilet, or making your escape. The task changes; the warning stays.
Reading the HUD before you move
| HUD cue | What it tells you |
|---|---|
| Suspicion meter (bottom centre) | Your running suspicion as a percentage — the game's direct readout of it. |
| Objective panel (top right) | "Don't get suspicious" plus the current task, such as Buy a screwdriver from OJ, Unscrew the toilet or Make your escape. |
| Day, room and clock (top centre) | The day number, current room and time, such as DAY 01 LIBRARY 01:42, DAY 01 LOCKDOWN 03:11 or DAY 02 YARD TIME 00:04. |
| RETURN TO CELLS alert | A countdown before LOCKDOWN; getting back to your cell in time lets you keep working on escape prep. |
The top-centre line is the anti-suspicion tool players ignore most often. It names the day, the current room or phase, and the clock, so it tells you which part of the routine is running and when. When the label changes from LIBRARY to LOCKDOWN or from LOCKDOWN to YARD TIME, the area the routine expects changes too. Re-check where you are each time it flips: if the routine is in the library and you are in the yard, you are out of area.
The RETURN TO CELLS countdown is the one deadline that should override whatever else you are doing. It runs before LOCKDOWN, and it is the interval in which you can still work in your cell before the door locks for lockdown.
Doing prison jobs without drawing heat
The official description sets up the loop: work prison jobs to earn cash, then buy tools from OJ's Deals. That loop doubles as cover, because a prisoner doing the scheduled job is a prisoner who is where they are meant to be. In the recorded route, the player went to OJ during RECREATION TIME and bought a Screwdriver for 25 cash; the objective then changed to "Unscrew the toilet."
Jobs are also a choice, not only income. In one recorded group, a $35 contract to kill another prisoner was on the table, and one player refused it rather than let suspicion climb — "We're not — I don't want my suspicion getting up, bro" — while a teammate said they did not care about their suspicion. The choice is the useful part: a payout is not worth a meter you have to live with. If a job carries a risk you do not want, you can leave it.
Shopping belongs in the same rhythm. The screwdriver purchase happened during RECREATION TIME, so treat a trip to OJ as part of the routine rather than something to squeeze into a job. The prison jobs and money guide pages go further into earning; for stealth, the point is to keep the money-making inside its scheduled window. When you do buy, the OJ's Deals shop page covers the stock.
Preparing the escape inside the routine
The official description lists the escape pieces — hide your tools, move the toilet, dig your way out, explore the dark tunnels — and none of them belong out in the open. The recorded run shows how they fit around the schedule.
- Buy the tool during RECREATION TIME. The player bought a Screwdriver from OJ for 25 cash, and the objective became "Unscrew the toilet."
- Use the return-to-cells window. After returning to the cell during the RETURN TO CELLS countdown, the player used the saw on the window bars. A "Saw bars" progress bar filled, the bars came out, and then the cell door locked for LOCKDOWN.
- Move during LOCKDOWN. With the bars already gone, the player climbed out through the window, sneaked into the vehicle area behind the cell block, collected cash stacks from an open prisoner transport, and entered the workshop marked with yellow-black hazard stripes. A free Power Drill sat on the workbench.
The order matters. Removing the bars in step two is the condition that makes the step-three exit possible; the night window is not a separate stealth trick but the phase in which the prep done in your cell pays off. That is also why the RETURN TO CELLS countdown should be treated as a hard deadline: it is the interval in which you can still work in your cell before the door locks for lockdown.
Keep the daytime version of the same logic. Roll call, jobs, purchases and the objective panel are the visible layer; bars, window exits and the vehicle area belong to the night layer. Once "Unscrew the toilet" is the current objective, the move toilet guide, digging guide and tunnels guide take over. The full walkthrough shows the complete sequence, and the escape plan page puts the stages in order.
Guards, CCTV and lights out
The official description names the detection risks plainly: stay ready for roll call, avoid guards and CCTV, and keep your suspicion low. It also gives the night its stakes — after lights out, prisoners are taken behind the STAFF ONLY door and "don't come back the same," which is why you are meant to escape before it is your turn.
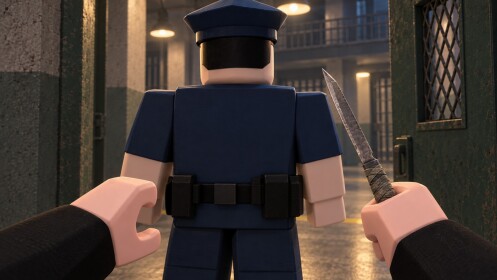
A guard in the cell block — the official description lists guards and CCTV among the risks to avoid while keeping suspicion low.
What you can act on is what the game shows you: the named area, the clock phase and the suspicion meter. Guards and CCTV are a reason to keep the visible part of your day ordinary and to leave out-of-area movement for the escape itself. The staff only door guide covers the lights-out premise, while the prison routine and day-night cycle pages follow the same clock.
The habit that keeps the meter down
Suspicion in 13 Days to Escape is not a puzzle you solve once; it is a running total you carry through the prison day. Check the top-centre label when it changes, weigh each job against the meter, answer RETURN TO CELLS before the countdown runs out, and use the window and vehicle area for the escape rather than extra wandering. You do not need an exact percentage to stay unnoticed — you need the routine on your side.
Related Guides
Keep Suspicion Low
What raises suspicion, what settles it back down, and the habits that keep your escape hidden.
Daily Prison Routine
Every scheduled block from wake-up to lights out, what each alert means, and what you must do in it.
Your Escape Plan
Order every day task, tool purchase and night action into one plan from wake-up to tunnel entry.